Tuesday, August 31, 2010

Honey Bunny PSP7 Tutorial


This tutorial was written for Paint Shop Pro version 7
Tutorial is offered here free of charge for personal use only!
Please read Terms of Use
©ArizonaKate.com 2006-2010, All rights reserved

Note:  Users of PSP 8 and newer,
click here for updated Honey Bunny tutorial.


~ Beginner Level Tutorial ~

The EggToon tutorials are a series of Paint Shop Pro cartoon drawing tutorials written especially for those just beginning to learn about the vector tools but I hope more advanced users will enjoy the toons also. 

If you're not familiar with vector tools, please review the series of posts explaining the tools and how to make the "egg" Preset Shape before starting this EggToon character tutorial.

Color settings for this tut:

Select black for stroke color and any 'bunny' color of your choice for fill.
Pick a pastel, a bright color, a realistic color...doesn't matter...this is a cartoon!!
I'll be using color #F0C5A2.

Remember, in PSP 7, you must always use the Object Selector [OS] to select a vector object for editing.

Open new image 300x300 or 400x400. We'll use a large canvas, but don't make bunny so large it fills canvas!  We'll  need  plenty of working room

Create with a white background layer. Click the 'new layer' button on the layer dialog box and add a 'new vector layer'. All vector drawing will be done on this layer.

MAKE A SET OF SHAPES                                       

First thing we'll do is make all the Preset Shapes needed for Honey Bunny and then edit each one by one.

Select Preset Shapes tool and select the egg shape. ( (go here for step-by-step to create egg preset shape if you haven't created one already) )

Line width 1, style solid, retain style UNchecked, antialias CHECKED, vector CHECKED, colors as described above.

Draw an egg that is about 85x120 pixels in center of canvas.
Look in lower right section of PSP frame to see size of object being created or turn on rulers (View>Rulers)

Select ellipse shape and draw 3 ellipses, any size (same settings, same colors). Position them off to one side...anywhere on your canvas....they will become the ears, arms and legs later on.

Sunday, August 22, 2010

How to Create a Custom Preset Shape

All the EggToon cartoon characters will be built using Paint Shop Pro Preset Shapes.  We'll start with the basic 'egg' shape and add other Preset Shapes as needed.   You may already have an egg shape in your Preset Shapes folder, but possibly not.   This tutorial will show you how to make your own custom shape and add it to 'Preset Shapes'  for use over and over again to create some EggToon characters.

If you haven't reviewed previous 3 or 4 posts explaining the vector tools and terminology, you should probably review that information before starting this tutorial. If you're used to working with vector tools, you probably won't need to review.

This tutorial was originally written for PSP 7, but has been updated for newer versions. (PSP X2 screenshots)

Open new image, 200x200 pixels with transparent raster background and 16 million colors (RGB 8 bits).

The checkered background indicates that it is transparent....and we'll need to have a transparent background when we save our egg as a Preset Shape.


If you prefer not to work with a checkered background, you can use white for background layer and create egg on a NEW vector layer.    We'll want to save the Preset Shape with a transparent background, so we can just DELETE that white layer later, before exporting Preset Shape.

Drawing the egg shape


Set black as your stroke color.


Set fill color to null. The texture styles boxes should also be null.
Next, select the Preset Shapes tool, Ellipse.


Tool Options: 
Mode:  Ellipse. Retain style should be UNchecked.
Create on Vector and Show Nodes should both be checked.
Line Style Solid, Line Width 1, Antialias checked.


In Paint Shop Pro 8 and newer, the tool settings are located in the Tool Options Palette that appears above the workspace when the Preset Shapes tool is selected.


In Paint Shop Pro 7 and older, the tool settings are located in the Preset Shapes dialog box that pops up when the Preset Shapes tool is selected.   Not all options mentioned for new versions are listed in older versions but that won't be a problem.


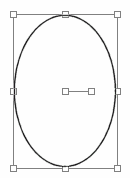
Draw an ellipse outline that is about 100 wide and 150 tall, similar to shape shown above.


Look in the lower margin of your workspace 
where PSP displays the size of the object as you draw it
along with some other information.

Use the Pick tool to deform vector objects in Paint Shop Pro 8 and newer.   (Some editing can be performed with Pen tool, but for this step, use Pick tool, located near top of toolbar on flyout with Mover tool.)


Below the Preset Shapes tool, in Paint Shop Pro 7 and older, is the Object Selector tool. This tool is used to select and edit all vector objects.   You must always use the Object Selector to select a vector  object for editing.


Select the ellipse shape. 
A boundary box appears around the ellipse that has 9 'handles' or nodes (shown as small boxes). 


The handles are in all 4 corners, plus one in center of each side and one in the very center of boundary box (which is the rotate handle). 


Hold down your Control key while you select one of the top corner handles.   A trapezoid shaped icon is displayed next to your cursor to indicate that you are now using the perspective deformation.

Keeping the Control key held down, move the top corner handle slightly toward the center of the ellipse until the shape gets a little narrower at the top, like an egg.


Now do the same thing on one of the bottom corners, except this time pull away from center until you are satisfied that your shape looks like an egg.

If you made the top or bottom too narrow or too wide, hold Control key down again and make adjustments by pulling a corner handle IN or OUT. 


Preset Shapes Library


You should now have an egg shape that looks something like this.

Next we'll save this egg shape as our own custom Preset Shape.

You can save any vector object to your Preset Shapes Library and then re-use them anytime just like the Preset Shapes that come with PSP.


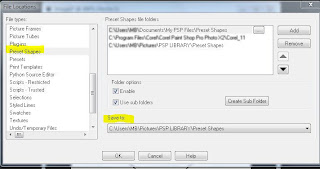
When you Export or Save a new Preset Shape, Paint Shop Pro will always save the shape to whatever folder is identified as your 'Save To' preference in the File Locations dialog box.   I will discuss changing that preference in a separate post, but you can view your preferences for Preset Shapes as follows:

For PSP 8 and newer, the settings are found in the File Locations dialog box by selecting 'Preset Shapes' from the list on the left side of dialog box.  (The File Locations dialog box  is under File | Preferences | File Locations).

For PSP 7 and older,  the settings are found under the Shapes tab in the File Locations dialog box (which is under File | Preferences | File Locations).


Look for the 'Save to' information to familiarize yourself with the file locations.


Saving Egg to Preset Shapes Library

If you used a white background when creating your shape, you need to delete that background layer now.    The shape we are saving must have a transparent background.

Make sure your egg is the active image and choose File | Export | Shape. The Export Shape Library dialog box will open and ask you to same the file.

In the dialog box, type the name for the shape you are saving....egg.   In newer versions of PSP, the file extension PspShape will be added:   egg.PspShape

Click OK to close the dialog box and SAVE the shape. It will be saved to your Shapes folder.

When you make the menu choice to Export Shape, a warning box may pop up that says:
Note: Only those vector objects currently selected will be exported to the shape library. To export all vector objects, make sure there is no selection before exporting.

This warning is a reminder....it occurs because there can be numerous objects in a vector drawing.
PSP gives you the option of selecting only ONE of the objects or ALL the objects to export as a preset shape and this pop up box is a reminder to check your selections!


In this case, because our drawing contains only one object...the egg.... it's not going to make any difference. You can continue by hitting OK.

Test Drive Your New Preset Shape


Let's try the new shape to see if everything is working OK!


Open a new image, 200x200 same as before (with white background).

Leave the stroke color as black but make the fill color any color of your choice.


Select the PreSet Shapes tool and locate the egg shape in the drop down list of shapes on the Tool Options bar (or, for older versions, in dialog box).


Retain style should be UNchecked to use the fill color, but check the boxes for antialias and create as vector.  Line style solid, size 1.

Now draw your egg preset shape, any size!!

Now draw it again, changing line width to 2 or 3 for a different look!

I hope eything is working well for you.   Leave a comment if you have a question and I'll try to answer.

We will be using this egg shape combined with other shapes to draw some easy Eggtoons!!    Future posts will have a number of beginner level toon tutorials and then we'll advance to more complex shapes, shading, and animating the toons!    See you then!

Monday, August 9, 2010

The Vector Edit Menu

There's just a little bit more preliminary stuff to discuss before we can actually start doing something with the Paint Shop Pro vectors tools! ;-)  

In addition to Node Type, there's many other editing choices available when creating with vectors. There's familiar choices such as Undo, Copy, Paste, Delete, Select All and Select None. There's also a few choices that are unique to vector drawing. You'll learn how to use these as we go along...but the following notes will help take the mystery out of another bunch of new terminology.


BREAK: You can break apart a line (contour) at a node. When you use BREAK, the selected node is converted into 2 nodes and the line segment is 'broken' into 2 lines.

JOIN: You can join the start point or end point node of one line (contour) with the start or end point nodes of another to form one continuous line (contour). To join the nodes, press Control key while dragging one node over the other. When the two overlap, the word 'Join' appears. Release the mouse button.


CLOSE: Closing a contour adds a NEW line segment that connects the start point and end point of the selected nodes. (JOIN does not add a line segment).

MERGE: Merging a node removes it and merges the two line segments that were on either side of it into one continuous line. This is handy when you find you have many more nodes than you actually need!! (Too many nodes is not good.)  You can merge one or more nodes along a contour (line). If you merge every node along a contour, it will delete that contour.

DELETE: Deleting a node removes the node and removes the two line segments (one on each side).

REVERSE CONTOUR AND REVERSE PATH: These will reverse direction of the start and end point. Used a lot for creating text that follows a curve.

There are many other options in the various dialog boxes that appear when editing vectors, two of the handiest ones are:

GROUP & UNGROUP: You may 'Group' different vector objects in your drawing in order to keep them together without merging them.  When grouped, objects may be moved about in unison. You must 'UnGroup', however, in order to edit each individual object.

PROPERTIES: In the Vector Properties box you can easily change all kinds of things...all in one place! Layer name, line & fill color or pattern, textures, line style, etc. 

We've gone over the purpose of  the tools and the meaning of some new words, so, next time we meet, we can get started drawing our toons!!

Tuesday, August 3, 2010

Nodes, Cusps and Contours

Before we start drawing any shapes with Paint Shop Pro, we need to review some terminology that may be new to you if you are just beginning with vector drawing!

Vector lines. shapes and text are edited by manipulating the Nodes.
  Nodes are indicated by square points on line and curve objects. You can change the shape of an object by dragging one or more of its nodes.

The straight or curved line between two nodes is a
line segment
A series of line segments and nodes create the contour of your vector object, also called path.  There are closed contours (when start and end nodes connect) and open contours (not connected).


You alter the shape of a vector object by editing the contour.  Edit the contour by adding, merging, moving or deleting nodes anywhere along a path. 


The arrows that stick out of each node are called Control Arms (also called "handles") and they determine the length, shape, and direction of the curve or angle of the line that is attached to the node.  


Pulling on the Control Arm to make it longer will also make the line attached to the Node longer, enlarging the curve.  See Control Arm examples above.

Every node has 2 possible handles. You can grab and drag a handle on either side of the node, depending on your intent. 

To change the size of a vector object, drag a corner or edge handle of the bounding box (all nodes selected).   If you want to resize while changing the current proportions, right-click and drag a handle.


We'll talk more about shape distortion later, but first you'll need to know how to change the Node Type.  This is an important thing to master.


There are 4 different Node Types:


1) With a Symmetric node, moving the Control Arm/handle changes the line on both sides of the node equally.    This will give you a smooth curve.


2) With an Asymmetric node, moving the Control Arm/handle will change the lines on both sides of the nodes at the same time, but not equally.  A curve made this way can have a different contour on each side of node.


3) With a Cusp node, you can pull each Control Arm separately for extreme changes in angle or have a different curve or angle on each side of the Node.   A simple square is a shape (contour) with 4 Cusp nodes creating the 4 corners.


4) With a Smooth node, you can create a smooth transition between straight and curved line segments. 


Changing Node Type: 
On the Tools toolbar, choose the Pen tool.  On the Tool Options palette, click the Edit Mode button.  Right-click a node, choose Node Type, and select one of the following options:


Convert to Line — straightens the segment before and after the node
Line Before — straightens the segment before the node
Line After — straightens the segment after the node
Curve Before — curves the segment before the node
Curve After — curves the segment after the node
Not that complicated, is it?   Just a few logical steps.


In older versions of Paint Shop Pro, the Object Selector is used to edit a vector object.  When Object Selector is active, right-clicking a vector object will open a dialog box of editing choices, including changing the type of node by selecting Node Type.


PRACTICE:  Draw a vector rectangle and experiment with changing the Node Type to see how it effects the shape (the contour).


To change two or more nodes at the same time, select each node before choosing Node Type. Hold the shift key down while selecting more than one node. Then right click and select Node Type.


In summation:  Although there are many combinations of node type that will influence the shape of adjoining line segments, there are 2 main concepts to remember....curve and corner. To make curves, use a node with symmetrical or asymmetical control arms. To make a sharp corner, use a cusp node combined with line before or line after (or both).   We'll go into more detail on this another time!


So, are you still with me? Not much more to review before we can actually start drawing something with these vectors tools! ;-)  


Note:   I'm having some trouble with Blogger here!  Won't change type size to anything other than 'small' and it's adding extra space between paragraphs.   Anyone know how to work around that?  :-/