

The Toolbar should be docked along the left side of your workspace (unless you've moved it). Most of the tools are used for drawing raster images, but there are 3 tools that can also create vector images: the TEXT tool, the PRESET SHAPES tool and the PEN tool.

The PICK tool may also be used to do some editing and selecting. It is found near the top of the Toolbar on the flyout menu with the MOVE tool.
Note: The letters shown along the right margin of the flyout menus indicate keyboard shortcuts for these tools, if you like that option. The main menu also indicates more keyboard shortcuts.


Many Preset Shapes come with PSP ...more than what's shown here....and even more can be downloaded to add to your Shapes Library. In an upcoming tutorial, I'll be showing you how you can make your own Preset Shape when we make an "Egg" shape for our EggToons.
Back to reviewing the other 2 vector tools, the TEXT tool and the PEN tool. They also have additional options. The image below shows a portion of the Tool Options palette that appears when TEXT tool is selected.

Choosing Vector on the Tool Options palette gives you many more editing options than creating with raster text. You can easily move vector text around, stretch or compress it, change the text entry (what it says), change the color, size, outline, and other properties as many times as you want (without starting over).
There are some menu options that will require you to convert vector text back to raster. We'll go over all these options as we use them.

Use the PEN tool to draw straight lines, freeform lines and line segments.
There are 5 modes to select from on the Tool Options palette for the PEN tool. Two modes for editing and three for drawing.
Edit mode (select)
Knife mode (cut)
Draw Lines & Polylines (line segments and curves)
Draw Point to Point (controlled draw) and Draw Freehand.
There are a number of other options on the Tools Options palette for PEN tool, such as 'line style'. We'll go over all these options as we use them.
So that about covers the 'what' and 'where' for the tools and their options. We'll talk about 'why' on another day. But, before that, we'll need to go over some new terminology. That'll be next....see you then!

.

The PICK tool may also be used to do some editing and selecting. It is found near the top of the Toolbar on the flyout menu with the MOVE tool.
Note: The letters shown along the right margin of the flyout menus indicate keyboard shortcuts for these tools, if you like that option. The main menu also indicates more keyboard shortcuts.

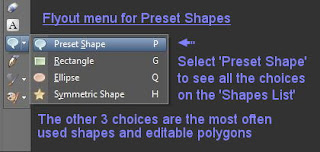
The little 'down' arrows adjacent to some tools on the Toolbar will show you a flyout menu when clicked. The PRESET SHAPES tool has one of those menus. There are 4 options on the flyout menu for this tool.
Preset Shape, Rectangle, Elipse and Symmetric Shape.
Depending on which shape option is selected, a different set of choices will appear on the Tool Options palette.

The Tool Options palette is located just above the workspace (by default). It can be undocked and moved to other locations in the workspace. In this tutorial series, we'll assume your Tool Options are above the workspace and the palette hasn't been moved. Every tool in the Toolbar has a corresponding set of Tool Options and the Tool Options palette will change according to tool selected.
When Preset Shape is the active tool selection, an additional Shapes List will be available on the Tool Options palette that looks similar to the image below.

Many Preset Shapes come with PSP ...more than what's shown here....and even more can be downloaded to add to your Shapes Library. In an upcoming tutorial, I'll be showing you how you can make your own Preset Shape when we make an "Egg" shape for our EggToons.
Back to reviewing the other 2 vector tools, the TEXT tool and the PEN tool. They also have additional options. The image below shows a portion of the Tool Options palette that appears when TEXT tool is selected.

Choosing Vector on the Tool Options palette gives you many more editing options than creating with raster text. You can easily move vector text around, stretch or compress it, change the text entry (what it says), change the color, size, outline, and other properties as many times as you want (without starting over).
There are some menu options that will require you to convert vector text back to raster. We'll go over all these options as we use them.
Anybody can draw a straight line using the PEN tool. No more shaky mouse-drawn pixel lines...take a little care and every vector line will be perfect!!!

Use the PEN tool to draw straight lines, freeform lines and line segments.
There are 5 modes to select from on the Tool Options palette for the PEN tool. Two modes for editing and three for drawing.
Edit mode (select)
Knife mode (cut)
Draw Lines & Polylines (line segments and curves)
Draw Point to Point (controlled draw) and Draw Freehand.
There are a number of other options on the Tools Options palette for PEN tool, such as 'line style'. We'll go over all these options as we use them.
So that about covers the 'what' and 'where' for the tools and their options. We'll talk about 'why' on another day. But, before that, we'll need to go over some new terminology. That'll be next....see you then!

.
No comments:
Post a Comment